Navigate a Blackboard Course Site
- Blackboard
Last modified: April 17, 2024
New to Blackboard? This page will help you find your way around.
You are viewing instructions for Original view in Blackboard (the current UAS default).
If you have elected to use Ultra, go to Navigating Blackboard Ultra course view instead.At a glance
Instructor View
UAS uses Blackboard to house online courses or course materials. It is accessed through the UAS Online portal. Course sites are created automatically for all UAS courses and are a good way to manage communications, assignments, and grading whether your course is online, face to face, or hybrid.
When you enter your course site, the instructor view will look like this:
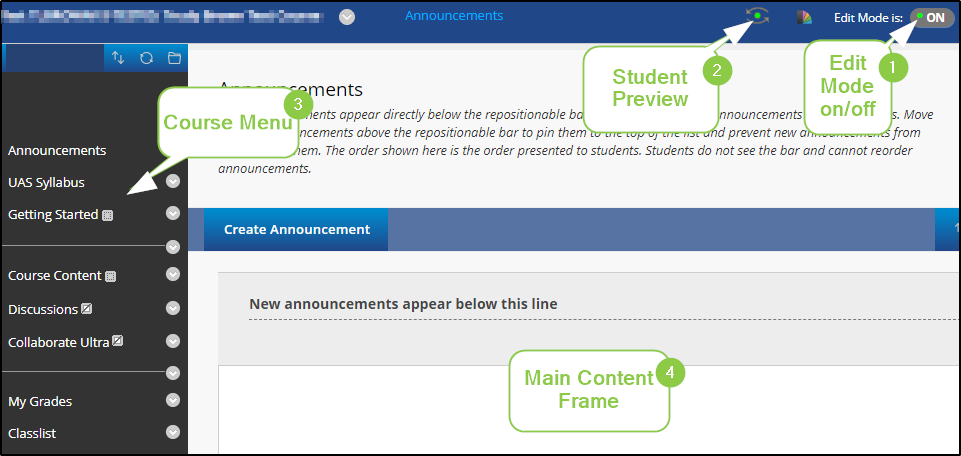
In the upper right of the figure above, you can turn Edit Mode on or off (1).
To see approximately what students will see in your class, click the Student Preview icon (2).
On the left of the screen is the Course Menu (3). The Course Menu displays links to Tools (such as announcements, discussion boards, grades, etc.) and Content Areas (default Content Areas shown are "Getting Started" and "Course Content").
When you or a student clicks on a link in the Course Menu, content is displayed in the Main Content Frame (4).
Menu Items
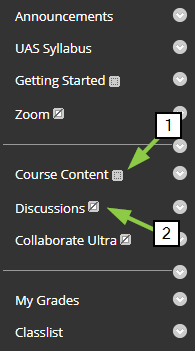
When you look at the course menu, you will see these icons next to the menu items
- When a content area is empty, you will see a square with dashed line outlining it.
- When it is hidden from the students, you will see a square with a slash through it.
Empty content areas will also not show to students until something is added to them. If you< forget what the icons mean you can hover over them.
Note – Discussions, Collaborative Ultra, and My Grades (the students’ view of the gradebook) are hidden by default. If you use those tools, you will need to use Show Link to make them available to students.
The Control Panel
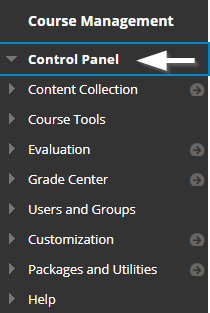
Below the Course Menu is the Control Panel. This is where you'll find Instructor Tools such as the Grade Center, Test Manager, Course Copy, etc. Click on a category to expand it and find links to access specific components which will display in the Main Content Frame.
Note - the Course Menu can be expanded and collapsed or hidden by clicking on the arrows at the top or right. If your course menu disappears you probably clicked on one of these!
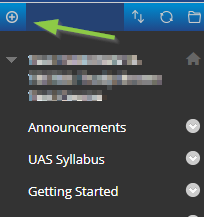
Navigating the Course Menu
The Default Course Menu
The default course menu contains the links pictured below.
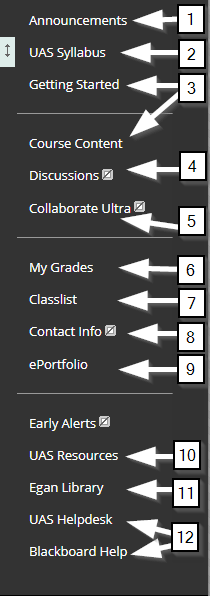
(1) Announcements: This is normally the entry point for the class. Post Announcements to students here. For each Announcement you'll have the option to email students as well.
(2) UAS Course Syllabus: All UAS classes are required, at a minimum, to post a syllabus using the UAS Syllabus tool.
(3) Getting Started, and Course Content. These are the two default Content Areas. Note the hollow square next to each. This indicates it is empty. Empty Content Areas will not show to students, so none of these links will show until you post something in them. Depending on the needs or your class you may or may not use all these Content Areas. You also have the option to create new Content Areas if the structure of your class would benefit.
Guest Access to Content Areas: "Guests" are visitors to your class who are not on your class roster. The default course site allows Guest access to Announcements, Syllabus and Getting Started but not to Course Content. If you create a new Content Area then it will also be set to "Deny Guests", but this can be changed using the drop-down menu to the right of the Course Menu link. The button for the drop-down menu only appears when the mouse is over a particular menu item. Guests are restricted from visiting areas Discussion and Classlist where student information is visible.
(4) Discussions (Discussion Board) - Create and manage discussion forums for your course. Note that this link is invisible by default (indicated by the white box with a line through it). The gray circle next to each link has options for customizing links, including "show link" which is used to make hidden content visible for students.
(5) Collaborate Ultra - This is Blackboard's synchronous virtual meeting platform.
(6) My Grades - This is the students gradebook. It is initially hidden by default. Again use the drop-down menu to show it. They see only their own grades here. Instructors access the gradebook through the Control Panel below the Course Menu.
(7) Classlist - links to the UAS Online class list
(8) Contact Info - Here you can add your profile and contact information as well as any other contact information that might be helpful to students.
(9) ePortfolio - link to the class related UAS Online ePortfolio
(10) UAS Resources - Here are links to tell you about academic resources at UAS including availability of tutoring and policies and resources regarding academic honesty, disability services, etc.
(11) Egan Library - This link to Egan library opens in a new window. Egan library serves not only local students in Juneau but distance students as well.
(12) Help - Here are some quick tips for students on basic features of blackboard and contact information for the UAS helpdesk.
The default course menu is created when the course sites are initially rolled out. Its design is subject to revision over time and may change based on feedback from faculty and students.
Managing the Course Menu
You can customize this by adding new content areas, tools, and links. You can also re-organize the links and hide them from students.
Add to the Course Menu
Click on the plus (+) in the upper left above the course menu to add new items.
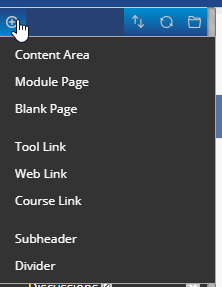
From the menu you get by clicking the plus (+), you can add the following:
- Content area - an area in which you can add items, tests, assignments, etc.
- Module page – this is a page that lets you add tools such as announcements, calendars, alerts, etc.
- Blank page – this is the same as an “item”, a page to which you can add formatted text and attachments. The difference is that this one will be a link in the course menu navigation panel instead of in a folder.
- Tool link – create a link to a tool such as discussion, calendar, Zoom in the course menu
- Web link – create a link to a website or URL that can be accessed straight from the course menu
- Course link – create a link to somewhere in the course
- Subheader or divider – text or dividers to make your menu more readable
One of the most common things you'll add is a Content Area - the default content areas are "Getting Started" and "Course Content" but you are not limited to these - you can organize your course content and activities as best suits your course.
Subheaders and Dividers are good ways to break down a long menu by dividing them into smaller groups - groups of 5 to 7 related items are easier to remember and understand than a very long, undivided course menu.
Edit the Menu Links
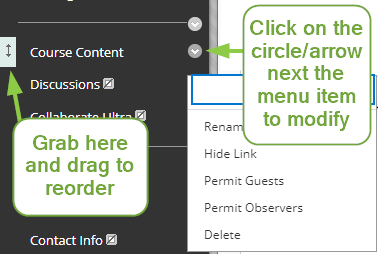
- You can "drag" on the up-down arrows to move the menu item up or down. ** NOTE: There is a known issue in Blackboard Original that causes the TOP menu item to be the course entry page. To avoid errors, please leave "announcements" at the top.
- Clicking on the circle-arrow gives you a drop-down menu to modify that particular course menu item.
- After clicking choose one of the links on the list
- Rename Link - change the name of that menu entry
- Hide Link - the link will be hidden from students
- Permit Guest - allow Guests (not just Students but anyone from the public) to see and use that menu entry. If the menu says "Deny Guests", then guests are currently permitted and you can change it to “Permit Guests.
- Permit Observers - if you see "Observers" in the menu, that is a special role that is not generally used
- Delete - remove that menu item