Copy a Course
- Blackboard
Last modified: February 22, 2024
Use Course Copy to transfer course material and activities from one course to another.
You are viewing instructions for Original view in Blackboard (the current UAS default).
If you have elected to use Ultra, go to Ultra course view on copying a course instead.How to Copy a Course
If you would rather watch a video walkthrough of this process, CELT has a video on Course Copy (5:28).
Two Important Notes about Copying Courses
First, be aware that some components of your course may be linked to other components. For example, a test deployed in a content area is linked to the Grade Center and to "Tests, Surveys and Pools". All three things need to be copied. That means that the safest way to proceed is to copy the entire course, then delete what you do not want.
Second, after you copy a course it is important to wait before editing. Even after the course copy email is received, wait half an hour or more before trying to edit the course - otherwise you are apt to be frustrated by items that refuse to be re-ordered or edited.
In the Original Course (The one you want to copy)
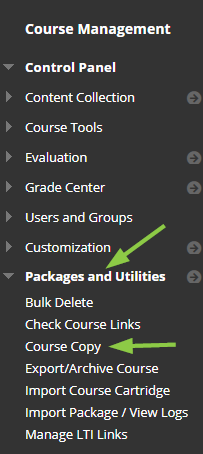
Go to the "Control Panel" and locate "Packages and Utilities". When you expand it, you should see "Course Copy".
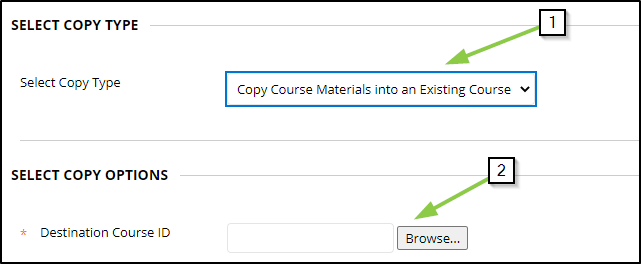
Browse and Find the New Course
- Leave the selection bar showing "Copy Material into an Existing Course"
- Click the Browse button to find the list of all courses to which you have access. Find the NEW course into which you want to copy.
The list of courses is ordered by semester. There may be more than one page of courses.
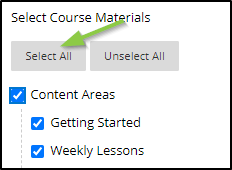
Select All
The safest way to copy is to copy everything and then delete what you don't want from the NEW course. Otherwise you may end up with elements that don't work properly or can't be deleted. Choose "Select All" at the top of the list. Don't worry about boxes that are unchecked when you click "Select All".
File Attachments
The final choice you need to make concerns file attachments. These are the options you have:
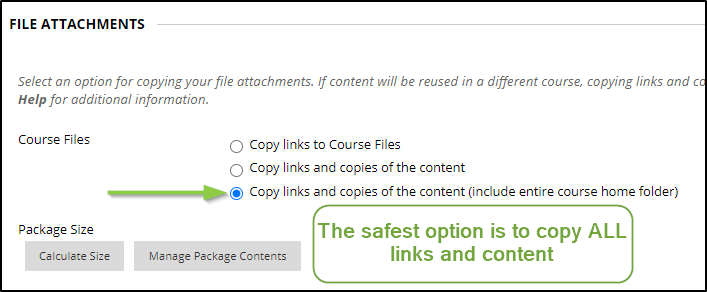
- For files (both files and images that might be in your course) you will want to use either the 2nd or 3rd option.
- The 2nd option will copy the files (including image files) that are in use in your course.
- The 3rd will also copy any unused files in your Control Panel > Course Files area.
- The 3rd option is the safest choice. If you have images embedded in tests or other files indirectly linked within the course, you will need to choose the third option.
Once you submit, you will get a success message in green at the top of the window. You will also get an email when the copy is complete. Remember to give it some time for things to settle into place before you attempt to make edits.
Other Tips for Copying Courses
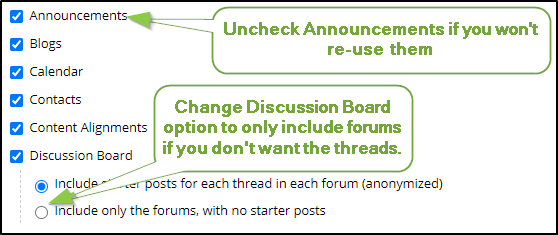
- Uncheck Announcements if you don't wish to reuse any of them in the new semester.
- Most likely you will change the option for Discussion Board to copy only the forums (not starter threads). This will copy the forums and their descriptions but not any posts.
- The exception for the Discussion Board option would be if you use forums where you are the one who creates the "starter threads" and students only reply.
What to Expect after the Copy
- If the NEW course has a content area with the same name as the OLD course, content and activities will be copied there. For example, if your NEW course has a "Getting Started" content area, then content from the OLD course's "Getting Started" area will be copied there.
- If the OLD course has a content area that has a different name (doesn't appear in the NEW course), then it will be copied to the BOTTOM of the NEW course menu. You'll need to reorder things. For example, your OLD course has two content area named "More Links" and "Final Project". In the NEW course they will be copied to the bottom of the course menu and need to be moved to the appropriate locations.
- You will want to make content unavailable until you have time to update information such as due dates etc.
Update the Dates in the New Course
After you copy a course from one semester to another you can change availability and due dates using the "Date Management" tool. This will enable you to either 1) list all dates and change them one at a time or 2) change all dates by a fixed amount. This applies to dates set using Blackboard's tools (availability and due dates). If you also include information about dates in the text of items or descriptions you will have to change those yourself.
You can find the Date Management tool under Course Tools in the navigation pane. Dates are adjusted for folders (if availability dates are used), Tests, Assignments, etc. Anywhere that a date was used to make elements available will be affected.
Options for Using Date Management
- Use Course Start Date: This lets you changed dates based on a course start date. For example if the previous semester started Aug 31 and a particular assignment was due 21 days later, then if you enter Jan 11 as a new start date the dates associated with that assignment will be set to 21 days after Jan 11.
- Adjust by Number of Days: Here you enter the number of days that you want dates to be adjusted by (positive for forward, negative for backward).
- List All Dates For Review: This option will list all the elements in your class that have dates associated with them. Next to each set of dates you'll find a pencil icon which will allow you to edit them. If you have a large number of dates it may take a while for this report to run - you'll get an email when its complete.
Holidays or days of the week will vary so if you use the automatic adjustments you'll probably still need to "List All Dates for Review" and tweak things but its a good way to get started.
Organizing the Copied Material in the New Course
Re-organize the Navigation Panel
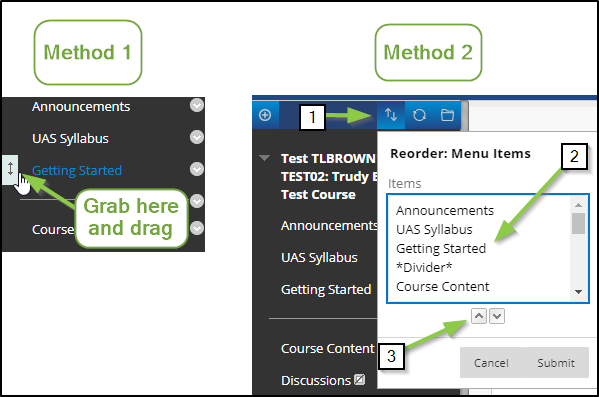
There are two ways to re-order menu items.
Method One:
- Move your mouse over a menu item and then "Grab" the up-down arrow next to the menu item (click on the up-down arrow, do not release) and "drag" the menu item to the appropriate location.
Method Two:
- Click on the two arrows at the top of the course menu (1)
- Select the menu item you want to re-order by clicking on it (2)
- Click on the up or down arrows (3) to re-order
- Submit when you are done
Menu items will refuse to re-order if you are currently looking at that item. Click on Announcements to get out of all other items and you should be able to re-order.
Deleting Items from the Navigation Panel
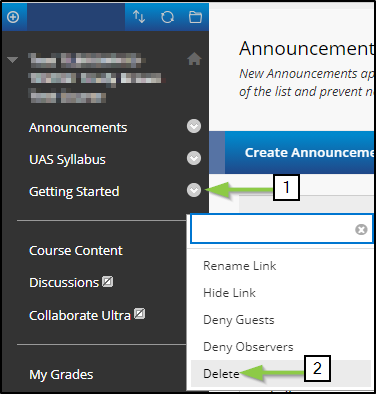
To delete something from the course menu, click on the drop-down menu (1) to the right of the item and choose Delete (2).
Hiding Content Areas
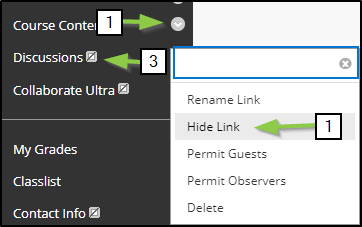
While you are editing the course, you may want to hide content from students. To do this use the drop-down menu (1) next to the content area(s) and choose "Hide Link" (2). When Content Areas are hidden from students you'll see a square with a slash through it (3) next to the menu item.
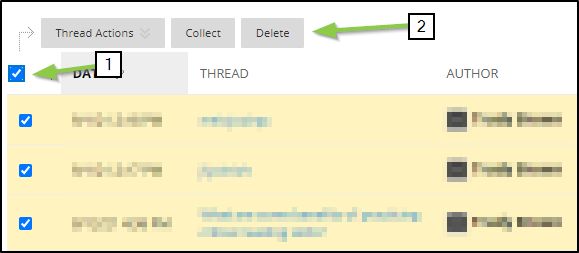
Deleting Unwanted Discussion Forum Posts
Blackboard copies Discussion Forum posts from one course to another but changes the authorship to anonymous and doesn't copy replies.
- If you have students reply as threads and copied those threads from the other course, you’ll need to delete all of those threads.
- Inside the forum, click the top box (1) to select all posts
- Click Delete (2)
The difference between course copy and archive

Copy a course when you want to duplicate your content from one course to another.

Archive a course if you want to save a record of that semester as a specific instance.
The archive course feature creates a frozen snapshot or permanent record of your course. An archive includes all the content, course statistics, users, and course interactions, such as blog posts, discussions, attendance data, and grades. You can also use this feature to export courses into other formats (or even back into blackboard), but if you want to just duplicate your content without student contributions or data, you'll normally want to use course copy instead.