Using Zoom and Zoom Recordings
Last modified: March 28, 2025
Zoom is a web-conferencing tool that can be integrated with Blackboard and used with hybrid or online classes in order for students to attend class meetings.
Accessing Zoom
Zoom can be used for meetings and online office hours. All UAS faculty, students, and staff have a UA Zoom account which can be accessed at alaska.zoom.us. When joining a Zoom scheduled by another person, it's best to sign in to your Zoom account or UA SSO account first to make sure that you are signed in with your UA credentials and will be able to participate as expected. Otherwise, you may find yourself listed as "guest" and you won't have the same controls and privileges as you would when signed in correctly.
For Zoom basics or support:
Integrate Zoom into your Blackboard Course
Quick Guide to Using Zoom in Blackboard
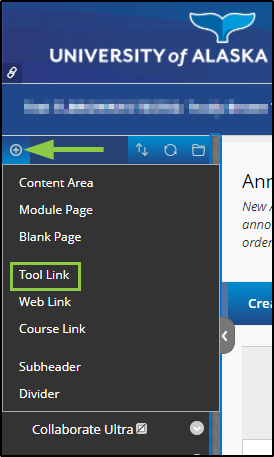
You can integrate Zoom into your Blackboard course so that students can easily access links and meeting. Start by creating a Tool Link for Zoom in your navigation panel. To add a Tool Link, click on the plus sign (+) above the navigation panel and then click on "Tool Link".
Once the "Add Tool Link" dialog box opens, name the link and select "Zoom Meetings (UAS) from the drop-down menu. To make it available immediately, check the "Available to Users" checkbox. You can change this later if you aren't ready to make it available yet.

The link will show up at the bottom of the course menu. Move it to the location that fits your course best. Now you can add Zoom meetings to this page to be accessed by students.

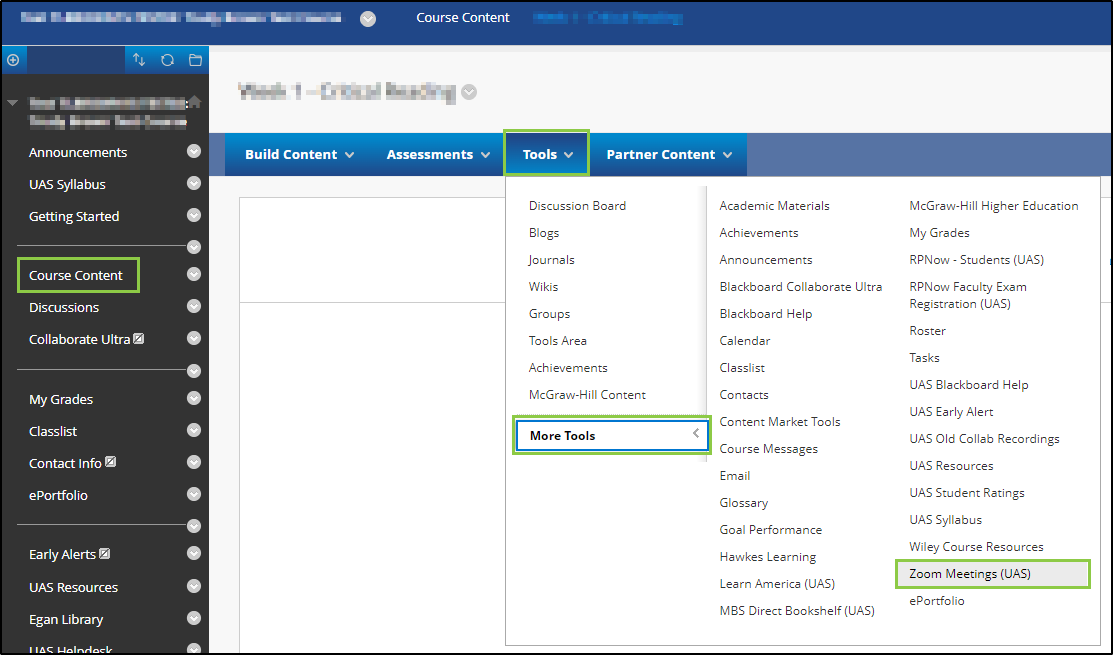
Alternatively, you can add the Zoom link to a content area by choosing "Tools" in the content area, clicking on "More Tools", and selecting "Zoom Meetings (UAS)".
Zoom Recordings
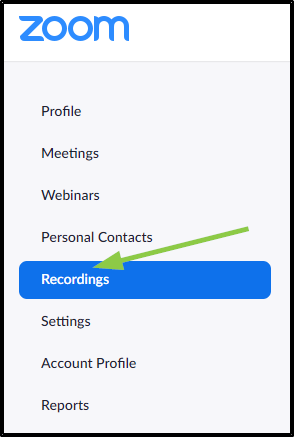
When you record a Zoom meeting, the recording can be found in your Zoom account. Choose "Recordings" from the list of links on the left side of the screen.
On this page you'll see a list of your recordings with important information about recording time/date, file size, and auto delete date. Recordings are automatically deleted after 730 days.
Edit or Share a recording
Minor editing can be done to your recording while in Zoom. From the recordings page, click on the meeting you want to edit. From this screen, you can do the following:
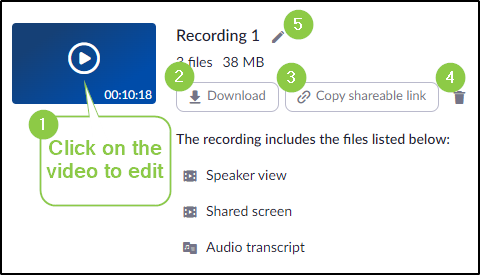
- Click on the video to trim the ends of the video or edit the captions.
- Click "Download" to download files associated with the video if you want to keep the video or post it elsewhere.
- Click "Copy shareable link" to get a link that can be pasted into an assignment or email for students.
- Delete the video and files associated with it.
- Click the pencil icon to rename the video.
Transcripts
Zoom creates automatic captions but they are machine-generated and need to be edited before being shared with classes. Edit the captions by choosing the section to correct and clicking the pencil icon. The captions can be downloaded as a file that can be uploaded to YouTube if you store your videos there.
