DocuSign
DocuSign is University of Alaska's cloud-based electronic signature solution. It allows users to send, securely complete, and sign a document with an automated workflow. Please note that document creation requires a UA-authorized account, available through a form on OIT's website.
What can you do with DocuSign?
- Easily upload and send documents for electronic signatures.
- Quickly access and sign documents that require signatures.
- Readily check a document's status, send reminders, view audit trails, and securely store online.
- Create templates using existing forms to help streamline the sending process.
- Oversee document workflow by identifying and managing recipients and routing.
- Make forms available online allowing for self-service and ease of accessibility.
To create and send documents through DocuSign you must request an account. To claim your UA DocuSign account go to Statewide DocuSign service page and choose the "Request a DocuSign Account" button.
An account is not required to sign documents. Requests are sent to an email address and can be completed in a browser.
Creating and Sending a Document
Sending a document through DocuSign can be done in a few different ways. Documents can be sent through email with the Envelope option, or through a clickable link with the PowerForm option.
Envelopes are great for sending out unique documents that need to be signed once or twice at most.
- Log in to DocuSign
- Start an envelope by clicking on the "New" drop-down menu on the Home or Manage page
- Select the "Send an Envelope" option

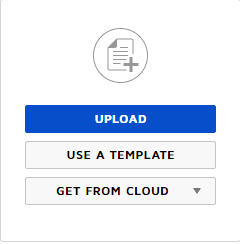
- Press the "Upload" button and select the document you wish to send
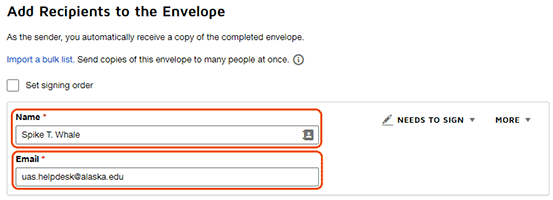
- Add the Name and Email of the recipients you wish to sign your document. Note that you can set a signing order if necessary by clicking the check box above the recipient list
- Click Next
- If you've uploaded a fillable PDF you can choose to Assign it to a signer to automatically convert the content
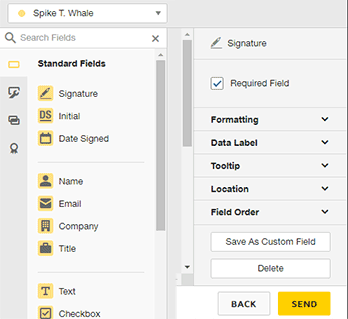
- Add the fields you'd like to be filled out or signed. Fields can be customized using the menu on the right
- When complete, click Send

Templates are great for documents that will need to be sent out multiple times, such as registration forms or request forms.
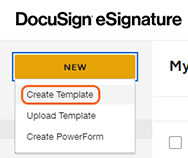
To create a Template:
- Log in to DocuSign
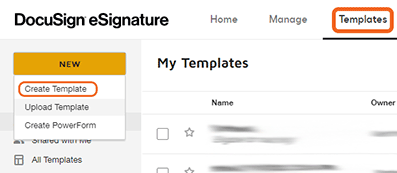
- From the Templates page click on "New" and select the "Create Template" option
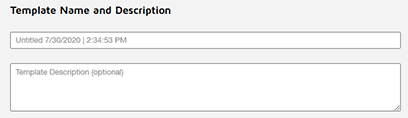
- Enter a name and description for your template
- Add the file you wish to have signed with the "Upload" button
- Add at least one role to your recipient list: you can customize this to a generic recipient (to set when the template is used) or a specific recipient (such as a department that's always a part of the process)

- Press Next to set signing fields

- Add the fields you'd like to be filled out or signed. Fields can be customized using the menu on the right (fields explained)
- To finish your template press Save and Close

PowerForms are forms that can be accessed and signed through a secure URL that can be linked to websites and emails. This is great for documents used often by a lot of people. Only accounts with the correct permissions can create PowerForms. If you need to create PowerForms contact your administrator.
To create a PowerForm:
- Log in to DocuSign
- Navigate to the Templates page
- Select the Template you have already created and wish to use
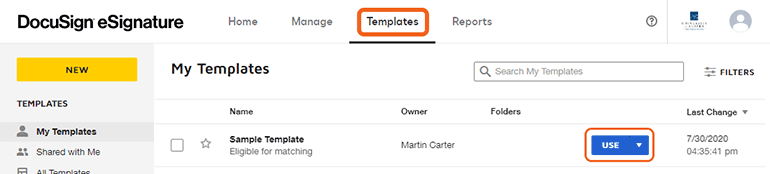
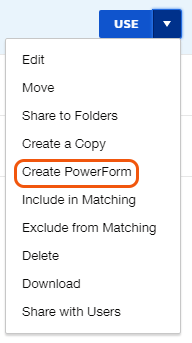
- Click the "Use" button to the right of the Template and select "Create PowerForm"
- Fill out the PowerForm Summary with the Name, Email Subject, and Instructions for the signer on how to complete your form
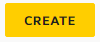
- Click "Create" to finish and create your PowerForm
- Locate (or create) a fillable PDF, with fields to be filled out by the signer
- Log in to DocuSign
- Access the Template tab

- Create and name a NEW Template
- Upload your fillable PDF
- You will see a notice that form fields have been found.

- You will see a notice that form fields have been found.
- Add at least one Recipient Role
- Click the Next button in the upper or lower right
- In the Manage PDF form field data, select Assign to: and select your initial Role from the dropdown list, then click Confirm

- After processing, you should see all the PDF fillable fields in Docusign format
- Adjust fields as necessary for Required, Added Text, Formatting, etc
- Click Recipient Preview in the upper right to view the current template
- Click Recipient Preview in the upper right to view the current template
- Click Save and Close to lock in the settings

Your fillable Docusign Template can now be sent to your intended recipients, or be used to generate a PowerForm.
Signing and Submitting a Document
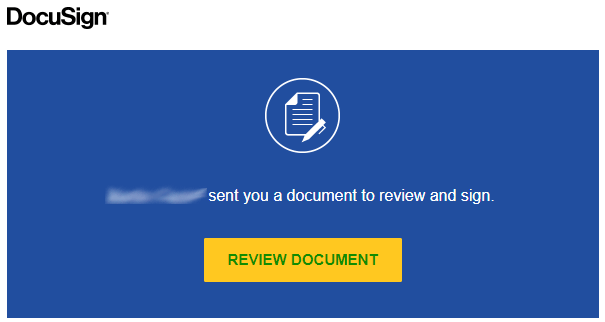
There are a few different ways to submit a signed document, depending on how it has been requested. You may receive an email request, a link to a PowerForm, or you may need to sign into DocuSign to submit manually.
- Click Review Document in the email sent to you
- Click Continue
- If this is your first time filling out a form, you must accept the terms and conditions

- If this is your first time filling out a form, you must accept the terms and conditions
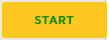
- Review the document. Click on the Start button to walk through each field that needs completing. Required fields are highlighted in red, while optional fields are highlighted in gray. Click on each field to accept or customize it
- Click Finish

A notification email will be sent when the document is completed.
- Follow the link to the online form
- Enter your full name and email address. Make sure to follow the instructions provided
- Click Continue
- If this is your first time filling out a form, you must accept the terms and conditions.
- If this is your first time filling out a form, you must accept the terms and conditions.
- Review the document. Click on the Start button to walk through each field that needs completing. Required fields are highlighted in red, while Optional fields are highlighted in gray. Click on each field to accept or customize it
- When you've entered all the necessary information, click the Finish button
You must have claimed a UA DocuSign account. To do so, go to NTS's DocuSign page and choose the Request a DocuSign Account button.
- Log in to DocuSign
Click New and select Send an Envelope
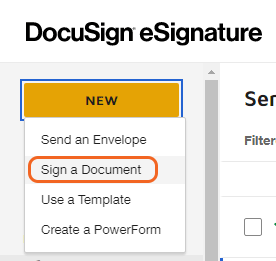
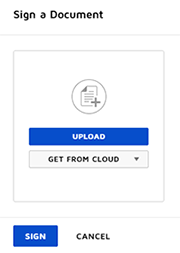
- Choose Upload or Get from Cloud depending on where your document is saved. Select the form to sign, and click the Sign button
- Click Continue
- If this is your first time filling out a form, you must accept the terms and conditions
- If this is your first time filling out a form, you must accept the terms and conditions
- Add the fields you'd like to fill out or sign. Fields can be customized using the menu on the right
- Click Finish from the top menu
- Add the recipient(s) you want to receive the signed form. You must include a Full name and Email Address. Click +ADD RECIPIENT to send to additional addresses. You can also choose to customize the email Subject and Message fields
- Click Send and Close
