Grading with Blackboard
- Blackboard Ultra
Last modified: April 30, 2026
Streamline your workflow with Blackboard's grading and feedback tools.
Important note
CELT does not recommend using Blackboard's built-in "attendance" tool. We find that it does not allow enough customization for 9/10 instructors. You can use the tool to track attendance without using it for a grade, but if you want to use attendance and/or participation for a grade, we suggest that instead, you create a grade category called something like "[my class name] participation" and then create assignments for each aspect you would like to grade on and put them in that category. For more detailed help, contact us!Step-by-step guide to grading
In Ultra, you can get to a course's Gradebook by selecting the relevant tab in the top navigation list, or you can find everything you need to grade by using your "base navigation" page under "grades".
When you create your course, the overall grade is not set up. It is important that you set up the Overall Grade so that students can see how they are doing in your course. You will see a message about the Overall Grade on the right side or the bottom of the page until it is set up. Once you select it, you can set categories and weights by using the calculation types.
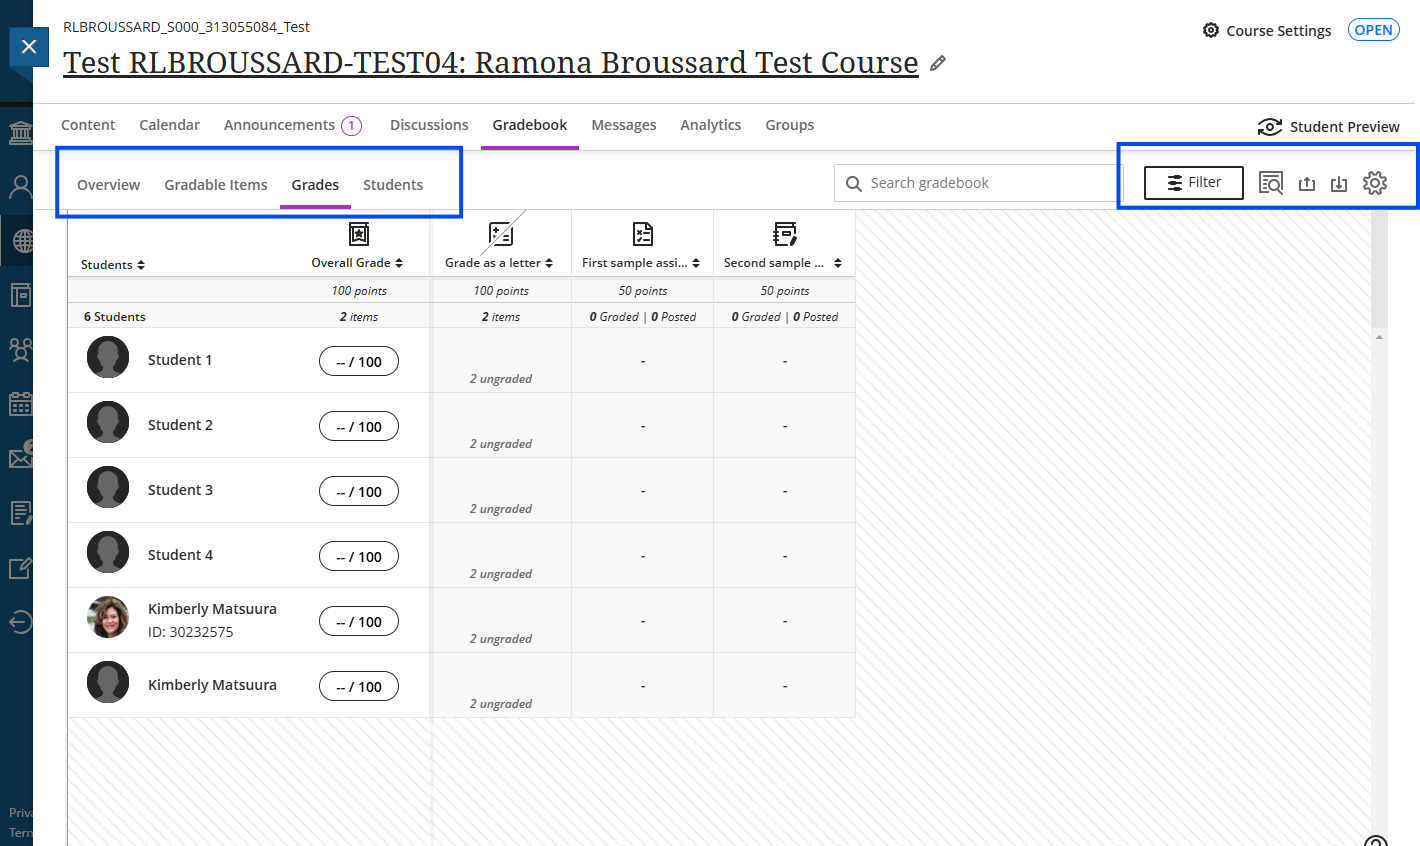
Once you are ready to grade, Blackboard has several views within the gradebook. You can choose to view the gradebook by an overview, gradable items, grades, or student.
Many folks prefer the grades view, where it's easy to see each assignment broken down by student in a spreadsheet-like format. You can add columns in this view by hitting the "+" that appears if you hover between existing columns. There are options to search, filter, upload and download, and find the advanced settings in the upper right under "student preview."
The Gradable Items tab displays all gradable items in your course. This is where you can re-order items by using the up-and-down arrow icon to the right of each item.
- Items with missing submissions past the due date display in red.
- Select an item’s name to go to its Submissions or Grades & Participation page.
- Select X to grade to go directly to the assessment’s Submissions page and start grading.
Students tab: The Students tab lists the names of all your students with their dates of last access and their overall grades. You can only see overall grades if you’ve set up the overall grade for the course. Students with grading accommodations have a purple flag with their name.
You can switch to the Students tab to view an individual picture of each student’s engagement. What the grading status text means:
- Nothing to grade - student(s) have not yet made any submissions.
- All graded - all attempt submitted to date have been graded.
- Complete- all attempts submitted to date have been grade and posted.
- X to Grade refers to the number of ungraded attempts available.
Video: Create rubrics shows how to create a rubric for assessing and grading student work.
*Students will not see your feedback until you "post" a grade.
If you'd like to provide students with some guidance on how to view your feedback, we have a short guide for viewing feedback for students that you can download and edit for your own use. For those using the app (e.g. on a phone), see the app guide for students viewing feedback. We also have a short video on a student view of checking rubrics and feedback.
Setting up the gradebook schema
Lastly, you can access the management functions from the gear icon that will open an advanced settings menu.
- You can adjust settings like "automatic zeros".
- From here you can also make changes to the grading schemas in your course. Select the Settings button to access the Gradebook Settings panel. Select Manage Grade Schemas to view the schemas available in your course. The default schema's name and values are defined by the administrator, but you can create new grading schemas and customize existing ones.
If you'd like to view a CELT video about the Blackboard Ultra Gradebook, see here.
To view a more detailed outline of best practices from Blackboard, see their video here.
Note on Screenshots
Blackboard Ultra is updated monthly, so the screenshots and videos provided may look a little different from what you see in your course. If a button or menu looks unfamiliar, try locating the most similar option. If something seems out of date, please email CELT so we can update our materials.