Email FAQ
General Information
Every account created at UAS is given a UA Google email address: username@alaska.edu. This is your official email address for university activity.
You have several options:
- UA Google webmail can be accessed from the Personal Menu (head and shoulder icon) as my Email at the top of UAS webpages. You can also access it directly by going to UA Google (google.alaska.edu).
- Configure Outlook to connect to UA Google. See UA Google Access for more information.
Simply update your Email Destination in ELMO:
- Sign in to ELMO
- Click the change link next to Email Destination
- If you have not confirmed this in some time, it will ask you to confirm automatically
- Enter your preferred mail address
- Click Save Settings
- UA Google is the standard email
- Other will redirect to any other account you enter (personal email address).
From this point forward, all mail you receive at any university address will redirect to your preferred address. All incoming emails will still be copied to your UA Google inbox. We recommend testing the forward function by sending your UAS account a test message. (Keep in mind that a typo in this process could result in either bounced or misdirected/lost email messages.)
Please note that UA employees are required to use their UA Google email address to conduct university business, and will be unable to set this forwarding.
Run the Google Workspace Sync for Microsoft Outlook tool
- Go to the Start menu
- Open the Google Workspace Sync folder
- If you do not see this folder, you can download the tool at Google Workspace Sync
- Select Set up a Google Workspace Sync user
- Sign in with your username@alaska.edu address and click Continue
- Click Allow when prompted in your browser
- Click Create Profile.
When completed, you will be prompted to select a profile when Outlook opens. By default, this is named "username@alaska.edu - Google Workspace." A Synchronize Status window will appear, displaying the status of Outlook connecting with the Google server. This may take some time, depending on the amount of email present.
Yes. Mac Mail (or Stamp Mail) is the recommended client for accessing your Google mailbox on a Mac.
- Open up Mac Mail
- On the toolbar, click on Mail and then Preferences
- Go to the Accounts tab across the top of the window
- Click the + button on the bottom left of the widow
- Select the Google Mail provider and click continue
- Sign in with your username@alaska.edu address
- Sign in with your UA credentials
Access to department email accounts is typically managed through the Group Security Manager tool. Ask your department's admin assistant about who manages that email account.
Webmail
Once you've logged in to Google Webmail, you can access any delegated accounts you have access to by clicking your profile button in the upper right (by default, an image of your first initial). This will populate a list of all of the delegated accounts you have access to. If you do not see one on the list, please contact the email account manager and confirm both that you have access, and that the account has been migrated.
(Video Instructions)
Outlook (PC)
After configuring Google Workspace Sync for Microsoft Outlook in Outlook, you can add additional delegated accounts through GWSMO.
- Exit Outlook
- Start > All Programs > Google Workspace Sync > Add account for delegation
- Select the Outlook Google profile
- Enter the account to which you have delegated access (typically UAS_account@alaska.edu)
- Click OK
The delegate account will now be added to your Outlook Profile.
Vacation messages can be added and removed from the webmail interface. Simply follow these steps:
- Log into UA Google
- Click on the Gear icon in the upper right
- Select Settings from the drop menu
- Locate the Vacation responder along the side
- Set the First day (and optionally the Last day)
- Edit your vacation message
- Click the button to turn the Vacation responder ON
- Click Save Changes
To remove Auto-reply or Vacation message, simply click the button to turn Vacation responder OFF.
Email passphrases are tied to all other UAS passphrase. To change your UAS passphrase, go to Login Help (ELMO) and reset the passphrase for all your UAS computer accounts.
Any change made by either Google or Outlook will need to synchronize before it shows up on the other side. If Google Workplace Sync is in the middle of a large batch of synchronizations, this may take some time. We recommend making all of your settings changes in Google, as not all changes in Outlook will spread to Google. If Outlook is taking too long to sync, close the program and reopen it.
Contacts in Google are accessible through the webmail interface. (Outlook users should use LDAP.)
- Log in to UA Google
- Click the 9-dots menu in the far upper right
- Select Contacts
This page lists all of the contacts created by your account, as well as a link to the full UA Directory.
To have your email automatically know the recipients' address by only typing their name, you'll need to be connected to the LDAP server. Here are the steps to connect to the UAS and UA Statewide LDAP services in Outlook. (Google webmail users should use Google Contacts.)
- Open your Outlook Google profile.
- Select the File menu at the top of your window.
- Under Account Information, click Account Settings, then select Account Settings... from the option choices
- In the Account Settings window, select the Address Book tab, then click New...
- Choose Internet Directory Service (LDAP), then click Next at the bottom of the window.
- For Server Name, enter ldap.uas.alaska.edu
- Click both check boxes, and enter your UA credentials
- Click Next at the bottom of the window.
- Restart Outlook when prompted.
These "bounced back" email errors occur when messages can not be delivered to an email account. This message will usually explain why the message was undeliverable and who the recipients were. If this is not clear, please forward the message as an attachment to the Helpdesk (uas.helpdesk@alaska.edu). We will be happy to help resolve the problem.
To forward a single message as an attachment, go to UA Google, check the email in your inbox, click the 3 dots menu at the top, and select Forward as an attachment. You can then send it as a normal email.
Students will want to use the syntax of username@alaska.edu as the address to give out.
Employees will be given a username@alaska.edu address that will be received at their primary Email Destination and in their UA Google inbox. Personalized email aliases (such as first.last@alaska.edu) can also be created in ELMO: log into ELMO's alias page. From here, review your alias options, and click the Activate button for any you would like to use. If there are additional addresses you would like to use, please contact the Helpdesk. Please note: once activated, these aliases will be permanently assigned to your UA email account.
Users with existing username@uas.alaska.edu accounts will still receive emails sent to these addresses. Employees with existing first.last@uas.alaska.edu vanity addresses will also receive mail sent to this address. Initially, these addresses are configured as their names are stored in the university information system (Banner), but can be altered to fit preferred names (Tom vs Thomas, etc). Please contact the Helpdesk for information about configuring this setting.
Google Webmail
- Click the Gear icon in the upper right
- Select See all settings from the drop menu
- On the General tab, locate Signature from the list of options
- Click the button beside the text field
- Enter the text of your signature
- You can also set Signature defaults immediately below, specifying different signatures per email address and whether the email is New or a Reply/Forward
- Click Save Changes at the bottom of the page
Outlook
- From a new email, select the Insert tab
- Click the Signature button, and select Signatures from the menu
- Click New to make a new entry
- Enter a name and click OK
- Enter the text of your signature in the Edit signature box
- Click OK
Google Webmail
- Compose a new email
- From the bottom menu, click the Insert signature button
- Select your preferred signature from the list
Outlook
- Create a New Email
- Select the Insert tab
- Click the Signature button and select your choice of created signatures from the dropdown menu
- Your chosen signature will be added to the end of the email. this will replace any other signatures chosen
Google Mail recognizes that the incoming message is identical to the copy in your "Sent Items" and ignores the duplicate. This is a part of Google's threading feature in the web client when you post a reply, your reply is threaded in with others' responses. This is a system feature and can not be disabled.
Sent emails can always be viewed in the Sent Items label.
UA Google doesn't actively update from the directory. It needs to be updated directly, and this will occur when a Username Regeneration request is placed in UA Online. Please note that doing this mid-semester can interfere with active courses.
Google has unlimited space. However, messages are limited to 25 Mbs each. If you need to send larger attachments, you can use Google Drive. If Google detects an attachment that's too large, it will automatically use Drive.
You can grant other people access to your Google email inbox. Please be aware that this grants them full control over your account.
From UA Google:
- Click the Gear icon in the upper right.
- Click See all settings.
- Select the Accounts and Import tab.
- In the Grant access to your account, click Add another account.
- Enter the other individual's @alaska.edu account.
- Click Next Step >>
- Click Send email to grant access.
- An email confirmation will be sent to their account.
- Upon the other individual clicking the confirm link, there is up to a 30-minute processing time. it will then be available from the upper right, similar to other delegate email accounts.
You can share your Google calendar with others and designate the level of access from view only to full access.
From UA Google:
- Click the Google Apps icon in the upper right
- Click Calendar
- Click the Gear icon in the upper right
- Click Settings
- Select the Calendars tab
- Click Shared: Edit settings for the calendar
- Under Share with specific people, enter the person's email address (e.g. username@alaska.edu)
- Select the appropriate level of Permission Setting
- Click Add Person
- Repeat steps until all people are entered
- Please also review the "Share this calendar with others" setting
- Click "Save"
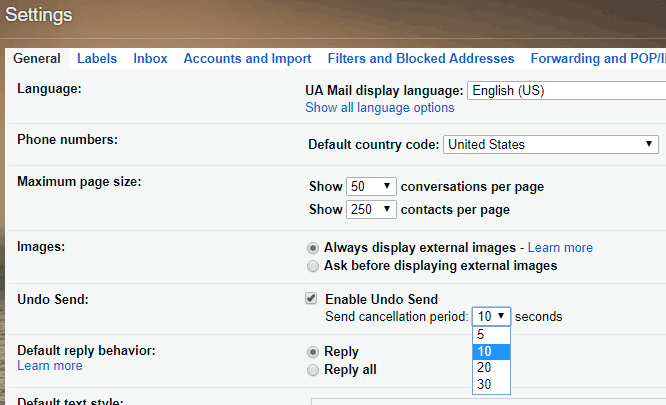
Google has a tool that allows you to delay outgoing messages. This means that after you hit Send, you've got a frame of time to cancel the message and make changes.
From your Google Settings, under the General tab, check the Enable Undo Send box. You can customize how long Google saves your message: 5, 10, 20, or 30 seconds.
Google's Conversation View is designed to keep all emails on the same subject together. It does this by filtering up to 100 emails with the same or similar Subject lines into one Conversation. This can cause difficulty if you have similar conversations at the same time.
To turn on or off Conversation View:
- Log in to UA Google
- Click the Gear icon in the upper right
- Select Settings
- From the General tab, scroll down to Conversation View
- Select the button to turn the Conversation View On or Off
- Scroll to the bottom of the screen and click Save
Spam
Spam refers to unsolicited emails with the intent of gathering information from the recipient. It may come in the form of advertisements, personal requests, solicitations, offers, prizes, or a myriad of other options.
What you can do to avoid being caught by spam:
- If you don't know if an email is sincere, ask. Your coworkers and the Helpdesk may be able to guide you.
- Always check the sender and recipient information on suspicious emails. Spam may have strange or false email addresses listed.
- Don't provide confidential information through email, if it can be avoided.
- Never reply to a fraudulent email. This gives the spammer information about you.
- Never click "unsubscribe" unless the message is from a trusted source. This gives the spammer information about you.
There are two ways to flag an email as spam, depending on your environment.
In Google webmail, open the email and click the Report Spam button.
In Outlook, open the email and click the Junk button. You have the option of blocking the Sender.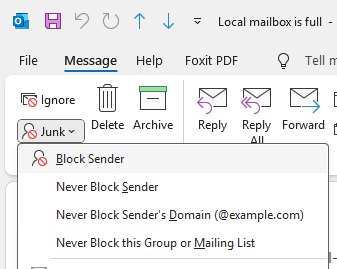
In Google webmail, select the spam message(s) and click the Not Spam button.
In Outlook, drag the message from the Junk/Spam folder to your Inbox.
Mail in your Junk folder will be automatically deleted after 30 days.