Use the Insert Link and Insert Image buttons in the WYSIWYG to create content links in pages. There are two kinds of links; internal and external.
What Kind of links are there?
Internal links are Managed (tracked) Links
Internal links are links between assets where both the asset containing the link and asset being linked-to are managed by the CMS. These are rewritten by the system to work both inside of the CMS and when published out of the CMS.
Most internal links are tracked. A tracked link is one that is updated automatically when the linked-to asset moves or changes names within the CMS. Use these whenever possible. These links must not cross into ‘hidden folders’ in the CMS (Marketing, Departments, Programs, Support) unless the page you are in is already in that folder.
The asset types capable of containing managed links are:
- Pages
- Files
- Templates
- Formats
- Blocks
External links are NOT Managed (tracked) Links
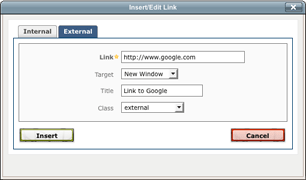
Full path links may be used when necessary as when you are linking to another website. Use the full path such as http://www.google.com
If you make the link open a new window give it the class ‘external’ (that puts the little arrow next to it).
External (Non-managed) links are not tracked. It would therefore not be updated when that url changed, resulting in a broken link. Pages that reside outside of the CMS must use the full path of an external link, but this should not be done to pages within the CMS, except when those links cross into ‘hidden folders’ in the CMS (Marketing, Departments, Programs, Support).
Inserting and Managing Links
To insert a link:
- Select your Page and click Edit in the action bar.
- Highlight the word or words you wish to hyperlink.
- Click the editor's Link button
 .
. - A link insertion dialog will appear.

- To link to a Cascade-managed asset, use the available asset chooser on the Internal tab and select the asset to which you would like to link.
- To link to an external resource, click on the External tab and type in the full URL for the resource to which you wish to link (i.e. http://www.google.com).

- Choose a target window for the link using the Target dropdown.
- Optionally specify a Title for the link.
- For advanced users, insert a Class and/or *Anchor for the selected text.
- Click Submit to insert the hyperlink.
- Check the Text being linked and amend it if necessary.
- Save the hyperlink in the page by selecting Submit on the page
To edit a link:
- Highlight or move the cursor inside of the linked content.
- Click the editor's Link button.
- Change the properties of the hyperlink and click Submit.
- Click Submit on the Page to save changes to the hyperlink.
To remove a link:
- Highlight or move the cursor inside of the linked content.
- Click the Unlink button (next to the Link button)
*Anchor Links
The 'Anchor' link goes to a location in the same page or on another page that has already been designated as an anchor.
FiYou put a '#' in front of the id to the location. Use these sparingly because they confuse a user when the page suddenly jumps somewhere else not in the viewable navigation.


