Submitting a Event for a Calendar
If you would like to have your event added to one of the UAS calendars, please submit a request using our online event request form (UA login required). For community members, please visit the "Organizing Your Event" page for more information.
Calendar Background
We have transitioned most of our calendars in use on our website over to a new widget that uses Google Calendar as its backend data store. We can present multiple Google Calendars as part of one calendar view. Using Google Calendar allows users to quickly add events using a tool available to all University of Alaska employees and eases the training burden, maintenance, and support calls.
In portions of our website which have not been transitioned over to the new look and feel we have employed an embedded calendar display directly from Google.
Subscribing to Individual Google Calendars
The following discrete Google Calendars are in use on our website:
- Academic Calendar
- Juneau Campus Events
- Sitka Campus Calendar
- Ketchikan Campus Calendar
- Student Activities Events (Juneau)
- UAS Alumni & Friends
- Egan Library
- Admissions Recruiter Calendar
- UAS Recreation Center (Juneau)
To add one of the above calendars to your own Google Calendar display click on the "+Google Calendar" link from the bottom right corner of the calendar display.
Requesting Google Calendar Editing Permission
Please contact the UAS web team with your request.
Creating Events
Google provides extensive help and support documentation on adding events to the calendar. Just be sure to select the right calendar! Once you've added your event, there is no need to republish the calendar page itself; the event should appear when the page is reloaded.
Special Cases
The UAS Recreation Center and Egan Library each have their own calendar which contains not only events they sponsor, but also events that occur in their facilities. If you are adding an event to a calendar you manage which will occur in one of those spaces, be sure to contact their respective staffs to let them know that they should copy the event to their calendar.
Legacy CMS Events
Certain portions of the UAS website are still using CMS events until which time their pages are transitioned over to the new theme.
To create an entry in a departmental calendar follow the below steps. These steps are for those sites that have a departmental calendar pre configured for their site(s).
-
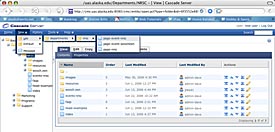 If you have a department calendar configured you will find this in your new menu as illustrated in the photo to the right (select to enlarge photos). To start a departmental event go to your new menu and follow the path to your page-event-dept template.
 -
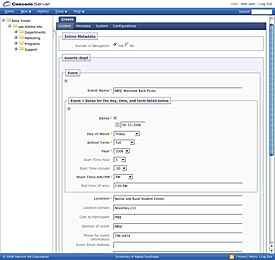 After selecting your department calendar from the new menu you will be presented with the content sub-tab under the create tab for a new event.
All items with yellow asterisks are required and must be filled out in order for the form to submit. The required items are what show for the event information. The other items are listed so as to provide more information or to allow for event follow-up by CMS administrators. Two items to pay attention to are the Website and location:
- Website: Be sure to include http:// in the web address. These URLS are also used in auto social posts and will direct viewers to the website specified.
-
Location: If a location is used in the drop down, the event post will include a Google map centered on that location. Entries in "If location is not listed above" will not result in a map and are often used for off-campus venues. Room number should be used in combination with the location dropdown to specify the room in a particular building.
-
The Event section of the form allows you to make multiple entries for reoccurring events. There are two methods for reoccurring events:
- Sign next to Event>>Dates for the day, time: Use this method if the start and/or end times will change for the event.
- Sign next to Dates: If the start and end times are the same and the only thing that changes is the date use this method.
-
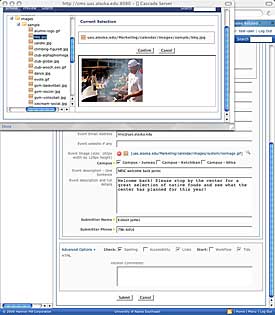 The second half of the content form provides the ability to supply an event photo/illustration. If you have images you’d like to use for your events be sure to upload them to your site’s image folder (or a folder under /calendar/images/events), then by selecting the image button you can select the photo. Due to the size of the event pop-up it is suggested that your image be 182 pixels X 129 pixels. For information on image prep please view the CMS help site on image prep. In the example, the event photo was selected from the sample folder that contains many logos and general imagery that’s been used in the past. Feel free to look through and use these images! At the bottom of the event content form under Advanced Options you have the ability to check spelling and to also submit your event. Feel free to check your spelling, but before selecting submit there are a couple of tabs to complete. The information you’ve completed will remain as you complete the next two tabs. Important: don't forget to publish your image!
 -
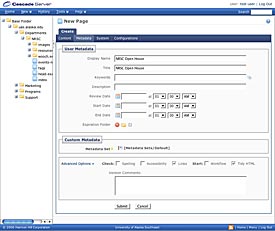 The next tab to complete under the create tab is Metadata. For your event to submit you must supply a Display Name and Title. Due to the event presentation being a pop-up, these fields will not display so you can cut and past the same information for these two fields. The remaining fields include Start and End Dates and the Expiration Folder. If you have an event that you don’t want to display or to be removed on a certain date you can complete these fields. Every department has an expired folder, be sure to point to it if you’ve selected and end date so that it has a place to expire when the date you’ve chosen is reached.
 -
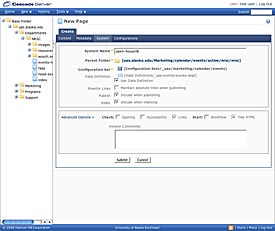 The last tab to complete is the System tab. The only field to complete is the System Name. This field is very important in that your naming must be Web friendly and written so that you could find your event if information is to change and requires editing. You might consider conforming to a standard way of writing your event names.
Now that you’ve completed all three sub-tabs of the Create tab hit the Submit button at the bottom. NOTE: By hitting Submit it does not publish your event... we’ll cover that in the "Publishing" section. Selecting Submit saves everything up to this point so be sure to select it!
-
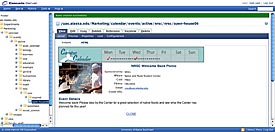 After selecting Submit you will be presented with the results and what users will see when selecting your event in either your calendar or the campus calendar. If you need to edit anything, select the Edit tab.
 -
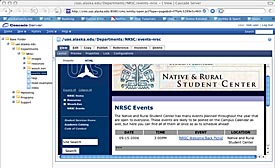 After selecting Submit in the step above, your event will automatically be listed in your department’s calendar.
Publishing / Unpublishing
Events are automatically published to website pages on a nightly basis. If you notice that your calendar is not getting updated properly, please do not hesitate to let us know so we can troublehsoot and fix the problem.
When deleting events, you'll be asked by the system if you'd like to unpublish the asset as well. Clear the "unpublish" checkbox and press the "Submit" button to delete the event. The appropriate calendars will be updated automatically within 24 hours.


